Preparing for the Amputation of a Leg
 Making the decision to amputate a limb is one of the most difficult decisions you will ever have to make. There is no turning back – once the limb is gone, your life will never be the same. For me I had to come to the conclusion that I had tried everything I could to regain the use of my leg and amputation was my only hope to live with less pain and possibly regain mobility without crutches. My amputation was to relieve chronic pain caused from a trauma to my ankle that could not be resolved through multiple reconstructive surgeries.
I had the luxury of preparing for my amputation and it made a huge difference in my recovery both physically and mentally. Unfortunately, in many trauma cases there is no time to prepare.
It is important to know that while amputation is a life-changing surgery and you will never be the same, the loss of a limb is not the end. In many cases it can be the beginning. It can free you from pain and the advancements in prosthetics has allowed amputees to return to their normal daily routine.
This link is to an excellent article published by inMotion, a publication of the Amputee Coalition of America. http://ampsurg.org/html/consumerarts.html
Click here for amputation terms to know.
My Tips for Preparing:
Emotionally – This will be the most difficult thing to prepare for. While there are things you can do to prepare for the amputation emotionally, it is impossible to know how you will react when you actually see the missing leg.
Most amputees need to grieve the loss of the limb. I already grieved the loss of use of my leg well before the amputation, so found I didn’t need to grieve the loss of the leg itself. It is completely natural to have good days and bad days. There are resources out there and your hospital or prosthetist will probably have a list of resources and a list of amputees in your area that are willing to come and talk to you.
My best advice is “attitude is everything”. It is very important to have a positive attitude about the amputation and that it is going to improve your life, not end it. It was my positive attitude that got me through and the reason I didn’t fall apart emotionally.
A psychologist can be very valuable in helping you to prepare emotionally for the amputation. They can provide some methods for dealing with this kind of trauma, they can guide you with your thoughts and most of all they are there to listen to you.
Prepare your family. If you have kids the subject of your amputation needs to be common conversation in your home. I discussed it at every opportunity I could find. The words “having my leg amputated” became as common as the phrase “please pass the salt.” I educated them in every way I could – I showed them pictures of what the stump would look like, joked about being one legged and laughed with them about tricks we could play on trick-or-treaters on Halloween with the amputation. I also recommend naming your stump, kids love that. My wife began calling mine “Stumpy” months before the surgery. If you have real young kids I suggest finding child-appropriate stories to read them that cover the leg amputation topic. I would also suggest contacting your local hospital or prosthetic center to see if they have a peer mentoring list. It might be helpful to find an amputee to meet your young child. If my kids had reacted in a scared manner to me it would have done me in. Do not make the amputation a family secret; get it out on the table and discussed as part of your daily family life.
 My kids’ words: “Naming the stump, getting the funny amputee tee shirts and joking about being an amputee helped us feel comfortable with the amputation.”
Here is a link to resources and books to teach children about limb loss: http://www.amputee-coalition.org/fact_sheets/help_child_understand.html
Resource to help discuss your amputation with your child: http://www.amputee-coalition.org/easyread/fact_sheets/childcope-ez.html
Keep open communication about the amputation with your spouse or partner. They will be your caretaker in the first weeks and this will forever change their lives as well. Help them prepare for not only your needs, but theirs as well.
It is impossible to know how you will react after the surgery. Even if you go into the surgery feeling prepared to handle the aftermath, you could fall apart when you see the stump. I was very fortunate that I had the strength to handle the whole process with a positive attitude. The best advice I can give is “attitude is everything” – get in the right mindset and be determined to maintain a positive attitude from the planning stages until the end of this journey, which will be your death at 95+ years old. Amputation will forever change your life, so the challenge is for life, but with the correct attitude, hard work and determination your life will be productive and rewarding.
My philosophy – if it needed to be done and I could find an adaptable way to complete the task, I found it and did it. I amazed myself many times in what I was able to accomplish with one leg. With this mindset I did not sit around waiting for the prosthetic leg to resume my life. I fully engaged back into a full and productive life well before even beginning the prosthesis process.
Click here to read my Sense of humor post.
Help is only a message away! Send me a message by using my contact button, private message me through my Facebook page or Twitter. I would love to chat with you!
Bathroom – The bathroom was one of the areas in the house that I found to be the most difficult to deal with, with the obvious obstacle being the shower. Make sure you have your shower set up so you don’t have to hop and balance on one leg. Have a grab bar installed, get a shower bench to sit on, install a hook outside the shower that is reachable from the shower bench to keep your towel and have a non-slip bath mat outside the shower. Within no time, with these items in place you will be able to shower independently.

 My shower routine: I use my crutches to get to the shower. I then turn using my crutches so my back is to the shower and remove my bathrobe. I then place my crutches so I will have easy access to them when shower is completed. Next I reach back and take hold of the grab bar in shower. I then carefully sit on the shower bench. When the shower is finished I reach out, grab my towel and dry off before standing. I then pull myself up using the grab bar, seize my crutches, throw on my robe and go.
I also recommend that you have a grab bar placed on the wall next to the toilet to aid you in sitting and rising.
Remove any rugs or mats from the floor that don’t have a rubber non-slip backing. Also, remove loose rugs or mats from areas where they are not needed, otherwise they will be tripping hazards. The only mat that should be in your bathroom is a non-slip mat in front of the shower.
Be prepared; the bathroom was the one area I got the most upset in. It’s very degrading when a necessary natural human function becomes so difficult. Some of the simplest things you never gave thought to will become obstacles that can bring you to tears.
My house was already set up for ultimate independence for a crutch-dependent person.
“For me the #1 thing that has made living with a leg amputation better is my willingness and ability to use crutches. I know to most people, crutches are viewed as torture devices, but with some work and determination they can become an invaluable walking tool.”
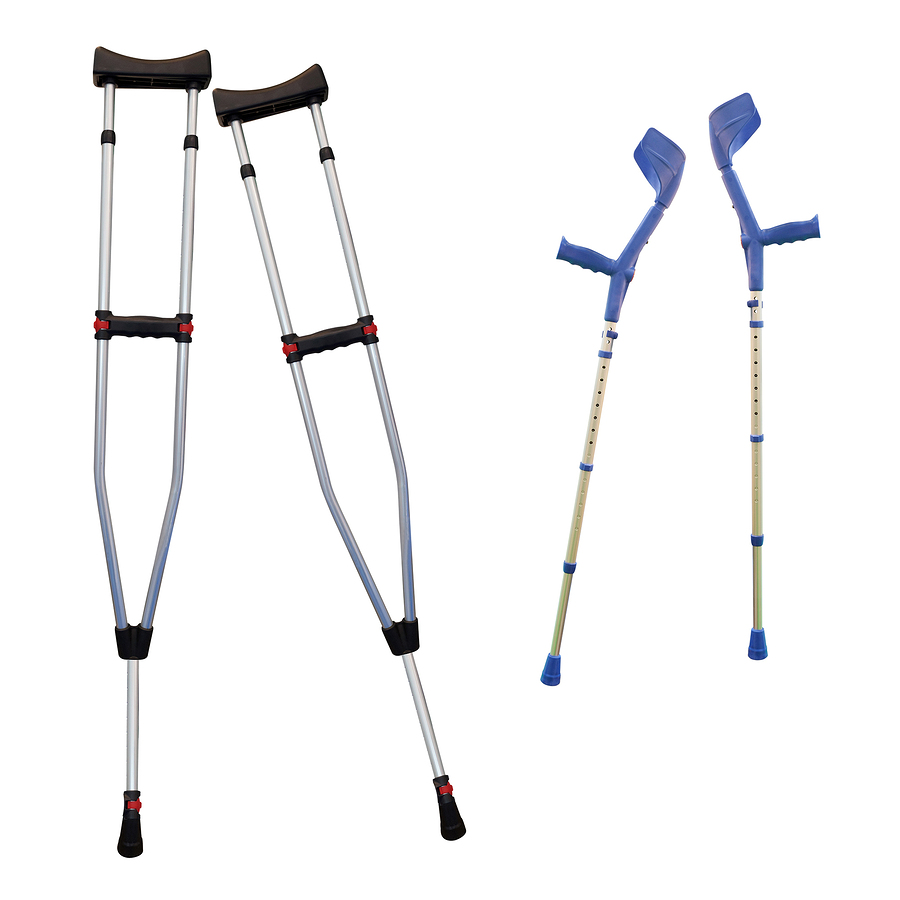 Crutches – If you are not experienced with using a pair of crutches, get a pair and learn to use them. Your ability to use a pair of crutches will make your recovery so much easier. (Crutch haters hear me out, please!) Not only will they provide the most efficient way to ambulate, but they will also aid in your overall health. Plain and simple, sitting 24/7 is just not healthy. The crutches allow you to stand and be vertical. You will have better blood flow, you will have less stump pain and you will be more physically fit when it comes time to learn to use the prosthesis. The best way I found to relieve my phantom pain was to grab my crutches and go for a walk.
Another thing that your ability to ambulate on crutches will help with is the Functional Levels Evaluation. This is an evaluation that you may have to go through at some point to determine the level of prosthetic leg you will receive. Often the insurance companies require this evaluation to decide what level of leg they will pay for. If you have spent the past six weeks sitting in a wheelchair your overall physical ability is going to have decreased, making it difficult to perform the tasks necessary to pass the evaluation i.e. if they feel you are willing to sit in a wheelchair they might only pay for a basic functioning leg.
I cannot stress enough how much the ability to use a pair of crutches can improve your life following a leg amputation. If you do not have any physical or health problems that would prevent you from learning to use crutches, get a pair and put the work in to becoming efficient on them. The payoff will be huge. My crutches are tools that have greatly improved the quality of my life.
* I do understand that there are physical health conditions that make it impossible to use crutches.
Click here to visit my review of crutches and for tips on becoming comfortable on your crutches.
The following is from an article from the Amputee Coalitions inMotion newsletter.
“Everyone who has been confronted with a lower-extremity amputation has had to make decisions regarding mobility options. Many amputees opt for a prosthesis as their primary mode, wearing it (or them) full-time. Some prefer wearing their prosthesis part-time or for specific activities. In either scenario, the “must-have” equipment, the most important aid that a single-leg amputee could ever invest in, is a pair of appropriate crutches.
“Crutches are an absolute necessity, especially for a single-leg amputee because they provide the most efficient means of transportation.” Madeleine Anderson
http://www.amputee-coalition.org/inmotion/mar_apr_10/overview_crutches.html
The Surgery
Sleep will be minimal the night before surgery and the walk into pre-surgery will be a difficult one. If you can still walk on two feet it will be your last two-footed walk.
The following links will give you explanations of the surgery steps involve in amputation.
Ask your surgeon about the method he will use.
http://health.howstuffworks.com/medicine/modern-treatments/amputation4.htm
Below-knee amputation surgical outline: www.ampsurg.org/html/tt1/printTranstibialTotal.htm
Above-knee amputation surgical outline: http://ampsurg.org/html/ak2/AK2outline.html
Partial-foot amputation surgical outline: http://ampsurg.org/html/PF1/pf1Segmented.html
Link to video of a below-knee amputation being performed: https://www.youtube.com/watch?v=t0eR7r4JEkA
My description of my amputation procedure:
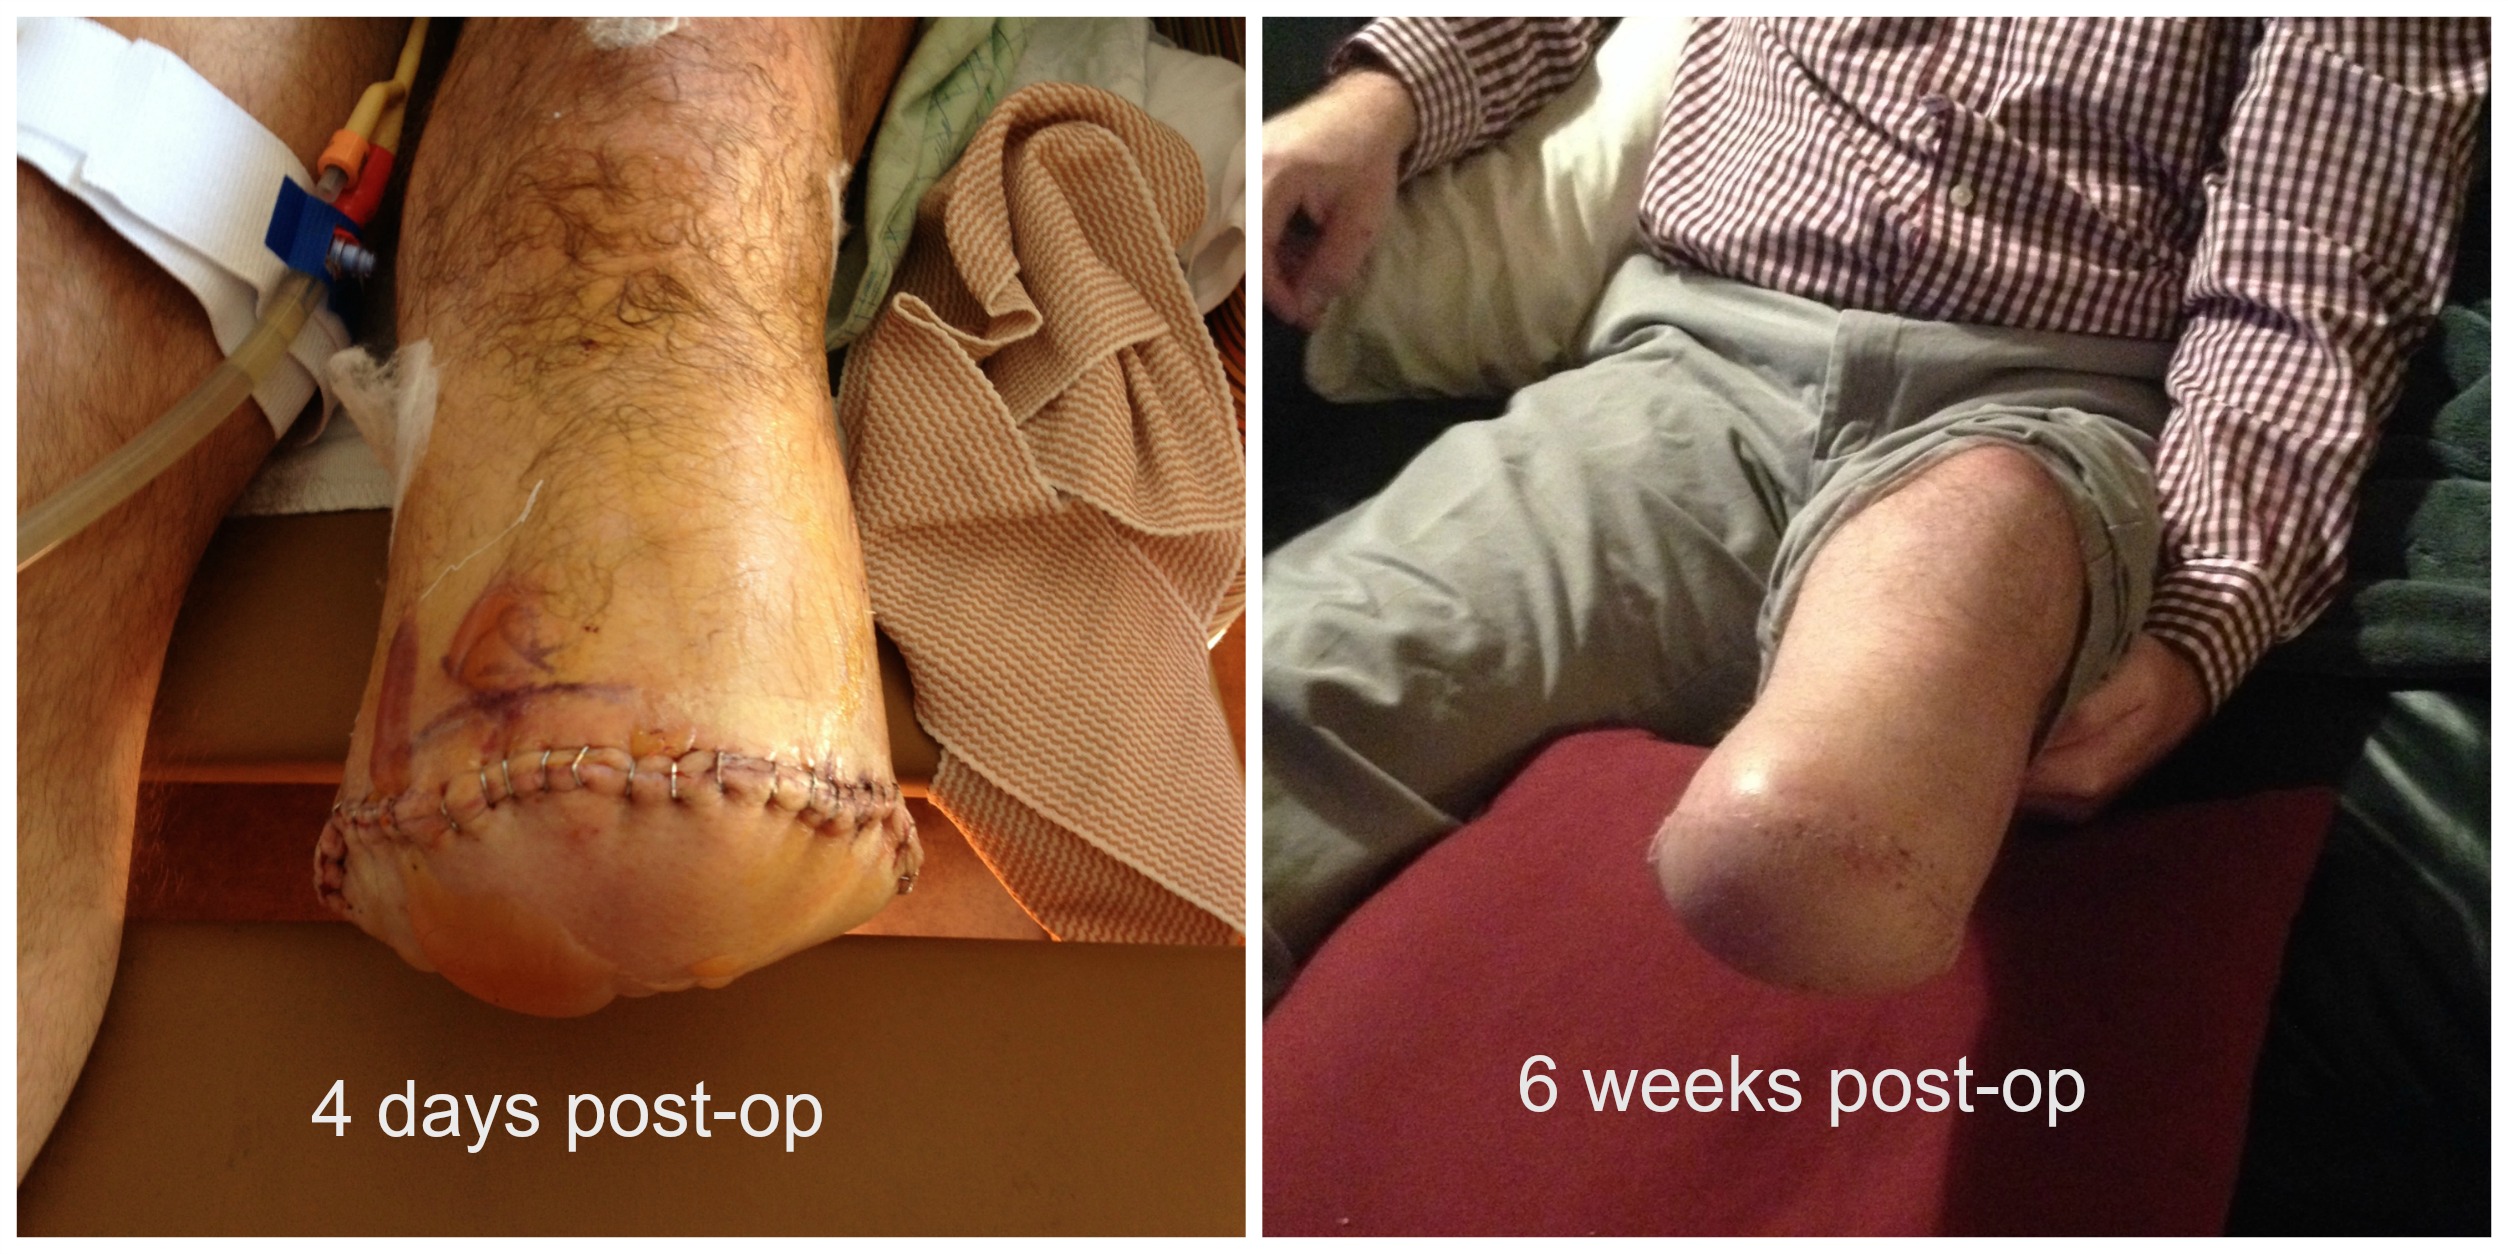
The damage was in my lower leg, ankle and foot, so I had a below-knee amputation (LBKA). My left leg was removed six inches from the top of my tibia. The surgeon cut thought the front of my leg at the six inch mark, though the tibia and fibula, leaving a flap of calf muscle and skin from the back of the leg. Next the muscle was folded forward over the end of the bones creating padding. The padding will help make wearing the prosthetic more comfortable. Lastly the flap of skin was folded forward over the muscle and stapled to the skin in the front of my leg, creating a large incision approximately 2/3 the circumference of the stump. 24 staples to be exact! A well-padded plaster splint was then placed on the remaining part of my leg holding the knee straight and for pain control.
That is the simple layman’s description. It’s obviously a whole lot more complicated as there are veins, arteries, nerves and tendons all involved.
The first days of being an amputee
Day 2 – I was afraid to move the residual leg. That did not last long as the nurses were quick to get me out of bed and into a chair. Once I moved the leg I was fine and ready to go. Soon Physical Therapy came to see me. To their surprise, I was eager to get up and take a walk with my crutches. At first they were hesitant to let me go, but soon realized I was more than capable of navigating on one leg and crutches.
Day 3 – Much the same as day 2.
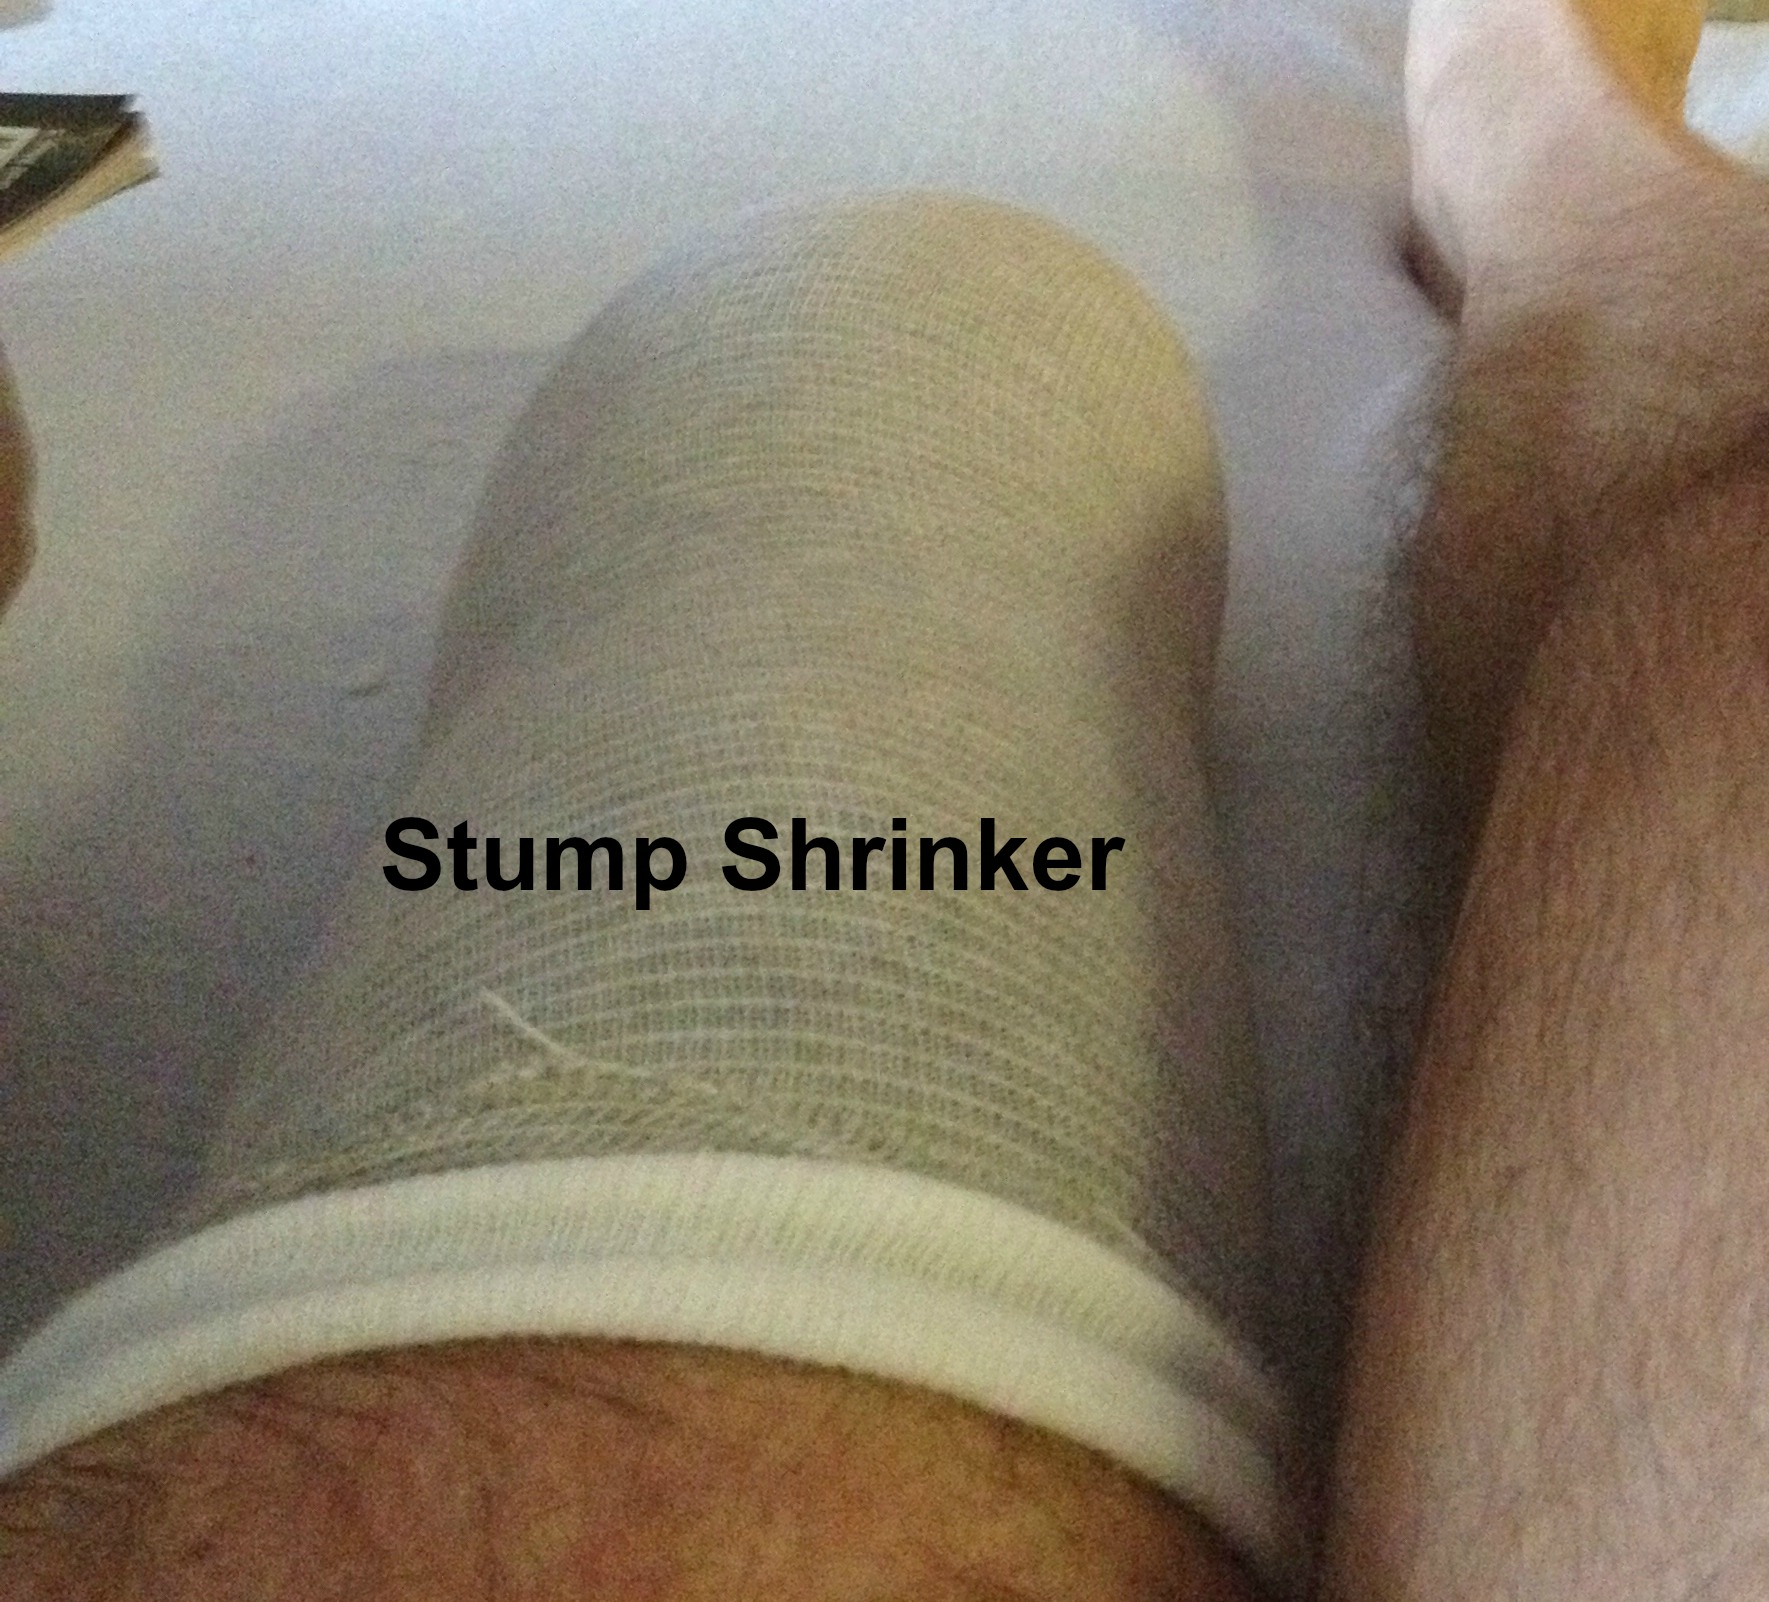
Day 4 – The orthopedic PA came in and removed the splint. While I knew the splint would be removed, it was comforting to have it on and I was hoping to keep it for as long as possible. As he began to remove the splint my eyes were fixated on the stump. Seeing the exposed stump was difficult and I wondered if I would ever get used to seeing it. It looked like something out of a horror movie. Dressings were put on the wound and the stump was wrapped with an ace bandage. Once again I was eager to get up on the crutches and take walks up and down the halls. Later that day I met with a prosthetist, who placed a stump shrinker on the stump. The stump shrinker is a compression-type sock that fits over the end of the stump and helps to minimize swelling. It prepares the stump to fit into the prosthetic.
Day 5 – I was discharged to go begin my life as an amputee.
Recovering from a Lower Limb Amputation
 Pain Management – You will need to work with your doctor to make sure your pain is managed well before leaving the hospital.
Ambulation – It is important that you work with physical therapy to ensure you will be able to be as independent as possible once you leave the hospital. This is where pre-surgery practice using crutches will have been very valuable. If you cannot safely walk with crutches or a walker you might end up in a rehab center. While a wheelchair is an option, it is not your best option as it will not give you independence and will weaken your body, making your physical recovery more difficult.
Wound Care – Getting the wound to heal properly is the primary concern. The wound can often be a difficult task to heal and take some time. Ask for wound care instructions before leaving the hospital. Your doctor will most likely not recommend starting the prosthetic fitting process until the wound is safely healed, which is about 6 to 8 weeks post-surgery.
Shrinker – The stump needs to shrink and shape properly for best results with the prosthetic. Therefore it is important to begin wearing a stump shrinker as soon as possible. The shrinker or properly-wrapped ace bandage needs to be worn at all times.
Preventing Muscle Contractures – This is more of a concern with a below-knee amputation as it is more likely to happen in the knee. In the first two weeks it is very important to keep the knee straight at all times. While sitting the stump must rest on something level so the knee remains straight, not bent. While lying in bed, keep the knee straight, and do not place a pillow under the knee.
The hip can also have muscle contractures so it is important to lie flat on your back and rotate to lying on your stomach periodically.
It is important to get the knee and hip moving as soon as possible.
Regaining your independence and life routine –
For me this was the key to my  recovery. Being as independent as possible and returning to life was the best thing I could have done physically, mentally and to combat the phantom pain. This is once again where I am going to advocate for the immense value in learning to use a pair of crutches. I completely understand that there are physical and health conditions that would make using crutches impossible. However, most people do have the ability to learn to use crutches and train their body to tolerate them with determination and practice. As a single leg amputee, being able to ambulate well on crutches is the best thing you can do for yourself. For the rest of your life you will have the need for crutches, even after you are walking comfortably in a prosthesis. (Grabbing a pair of crutches for night trips to the bathroom is going to be much more convenient than putting on your leg or climbing in and out of a wheelchair.) I promise you, becoming comfortable on a proper pair of crutches will improve your life as an amputee tremendously.
My philosophy – If it needed to be done and I could find an adaptable way to complete the task, I found it and did it. I amazed myself many times in what I was able to accomplish with one leg. The old saying applies well: “if there is a will, there is a way.” I began this mindset at 2 weeks post-op.
Emotionally – This might be the most difficult part of the recovery. Even if you go into surgery thinking you are prepared, you have no idea how you will react when seeing the leg gone. I was lucky it didn’t bother me and I was able to maintain a positive mood. That doesn’t mean learning to live without the leg was easy; it was a humbling and at times a difficult experience. I had times where I broke down and cried due to frustration in doing something as simple as retrieving my pants from the public restroom floor. (Keeping balance, doing your business, trust me – the pants end up on the floor.) There’s no question that life without a leg is not easy, but you will learn how to overcome it as long as you stay positive and put some work into it. “Attitude is Everything.”
Find help from family, friends, psychologists, and other amputees. With today’s social media, finding other amputees is easy. You found me! Friends and family are great, but only another amputee can truly understand what your life will be like. There are a ton of online resources and most hospitals and prosthetists can set you up with resources such as support groups and peer mentoring. Do a Google search for amputee support centers near you.
Help is only a message away! Send me a message by using my contact button, private message me through my Facebook page or Twitter. I would love to chat with you!
Phantom Pain – The Mayo Clinic defines phantom pain as “pain that feels like it’s coming from a body part that’s no longer there”. It can come in the form of pain or sensations. Phantom pain is when you feel pain in a limb that is no longer there, while a phantom sensation is feeling that the limb is still there but not experiencing pain from it. It is thought that phantom pain comes from mixed signals from the brain. The brain loses the nerve signals from the missing body part, so the body is triggering a message to the brain that something is wrong.
Managing Phantom Pain – Without Drugs
Mirror Therapy
 I began doing Mirror Therapy around week 4 post-surgery. At that point my phantom pain was very bad and I was desperate to get relief. After a few weeks of faithfully practicing Mirror Therapy my phantom pain was significantly reduced.
Key factors for success with Mirror Therapy:
- Easy to do at home without a physical therapist
- Need the correct size mirror – needs to be long enough to see the full reflection of the remaining intact limb
- Practice it daily
- Each session should last for a minimum of 20 minutes
- Need to be completely focused on the image in the mirror
- Takes at least a full week to notice any improvement, so don’t give up after a day or two
Links for directions:
http://www.amputee-coalition.org/inmotion/nov_dec_10/mirror_therapy.pdf
http://www.medicinenet.com/script/main/art.asp?articlekey=88097
Icing/heat
In the evening while relaxing use cold and heat therapy.
For twenty minutes ice the stump to reduce swelling.
Follow with twenty minutes of heat to open up the blood vessels and allow better blood flow. The heat feels so good after the ice.
I found a great product called the Polar Sleeve. The Polar Sleeve was designed for amputees and has two pockets inside a sleeve that fits around the stump, with two Velcro straps holding it in place. The pockets hold reusable cold/hot packets. The great thing about the Polar Sleeve is that it gives either cold or hot therapy around the entire stump. The packets are held in place, never sliding off, and if you need to get up for something, it goes with you.
http://www.polarcapz.biz/polar-sleeve
Massage
Tactile therapy and massage can also help. This helps to focus the mind on the part of the limb that is still there.
I use a variety of items that have different textures.
- Tapping stump and residual limb with an empty paper towel roll
- Brushing the stump and residual limb with a hairbrush
- Buffing stump and residual limb with a soft stuffed animal
Gently massaging the stump for a few minutes is also very effective.
TENS Unit (While I liked the feeling when using the TENS Unit, I really didn’t feel it helped with pain. Some people do though, so give it a try)
Transcutaneous Electrical Nerve Stimulation. The TENS machines works by sending stimulating pulses across the surface of the skin and along the nerve strands. It helps prevent pain signals from reaching the brain. It also helps to stimulate your body to produce higher levels of its own natural painkillers (endorphins).
Exercise and Movement
Honestly, the best way I found to relieve my phantom pain was getting up and taking a walk. Of course to use this method you need to be able to use crutches or a walker.
Sitting all the time reduces blood flow and aids in pain. When you are up and moving around you have better blood flow which helps with the phantom pain.
Exercising the residual limb also helps in reducing phantom pain.
- Stretching the residual limb
- Moving the residual limb
- For BKA – flexing the knee
Find ways to keep busy and keep your mind active on other things.
Sitting around focusing and dwelling on the amputation only aids in focusing the brain on the phantom pain. Redirect the brain by stimulating it with other things.
I’m happy to say that by the 8 to 9 week period I was getting nice breaks in the phantom pain. It was not by accident; I was determined that I was not going to let the phantom pain get me. A lot of time and effort went into easing my phantom pain. I now have days and nights where the phantom pain is minimal and very tolerable.
Excellent video on phantom pain:
http://j.mp/1h2Eel1 Phantom pain 6th sense
Amputee Coalition – http://www.amputee-coalition.org/
Wiggle Your Toes – http://wiggleyourtoes.org/
Limbs For Life – http://limbsforlife.org/
The following link is a fantastic resource on post-amputation surgery complications: www.oandplibrary.org/alp/chap25-01.asp
The Prosthesis Process
The prosthesis process should begin before the surgery. Visit a prosthesis pre-surgery to discuss all the pros and cons of wearing a prosthesis.
Every surgeon and prosthetist is going to have their own process they use. The following is my experience. While it might not be exactly what you will follow, it will give you a good idea what to expect. The differences will not be significant.
The actual process should begin before you leave the hospital. You, your surgeon or hospital should have notified the prosthetist that you will be having the surgery so they can make a hospital visit with you.
In the hospital – You will meet with your prosthetist. They will go over the process and provide you with a stump shrinker.
 Evaluations – I went through a series of evaluations to justify the level of leg that would give me the best function to return to my active life. The evaluations were also used for justification for the insurance company.
Physical Therapy Evaluation – This evaluated my level of functioning. I was asked to perform a series of activities such as, stand on my remaining leg for 30 seconds without any other support, transfer from one chair to another without using arms or any support, bending to pick an object off the floor without any support, walking with crutches and climbing stairs using crutches. This evaluation was used to access my physical condition for the physical therapy I would require and to justify my leg to the insurance company.
Evaluation with Physical Rehabilitation Doctor – This was to evaluate what level of leg I would require, once again based on my current physical condition and what I hoped to accomplish with a prosthesis. This report was also given to my insurance company.
 Surgeons Clearance – At around 6 to 8 weeks you will get clearance from your doctor for leg fitting. This is providing the wound has healed well.
Casting for Socket – In this visit with your prosthetist you will be measured and your stump will be casted for the preparatory prosthesis.

This is the cast that my temporary leg will be made from.
Fittings – This will be the process where all the adjustments will be made in the leg. Once all the adjustments have been made you will take delivery of your leg.

Test leg 1st fitting
Preparatory Prosthesis – This will be the leg that you learn to walk with and helps to shape the stump. As you use the leg the stump will lose volume and it will become desensitized. Basically, the temporary leg helps to reduce the swelling, gets you used to having a leg on and teaches you how to use a prosthesis.
 Learning to walk – For the best long-term results it is recommended that getting accustomed to wearing the leg and applying full weight through it be gradual. The stump and the skin need to adapt to having the prosthesis on. The first lesson in using the prosthesis will be from the prosthetist, and after that a physical therapist will guild you.
Definitive Prosthesis – You will get this leg when most of the changes have occurred in the residual leg. This will be a permanent leg and is built to last for several years.
For the first year after getting your definitive leg you will have regular follow-up visits. Lots of adjustments will most likely need to be made for ultimate comfort and performance. After the first year, maintenance and function checkups are usually made annually.
Interesting link to read about prosthetic limbs: science.howstuffworks.com/prosthetic-limb1.htm
My Quick List of Tips That Made My Life Easier
- A proper pair of crutches – put the time & effort into learning to use them and it will be a huge payoff.
- Set up a comfortable place to hang out in your house where you can rest your stump properly and things that you are going to want are at arm’s reach.
- Shower bench adjusted to a safe & comfortable height.
- Hook for towel next to shower and reachable from sitting on bench (a simple coat hook from a hardware store works perfectly).
- Grab bar in shower.
- Grab bars installed on wall next to toilets.
- Rubber backing non-slip bath mat in front of shower.
- Everyday-needed toiletries convenient at bathroom sink (in easy-reach drawer or basket next to sink).
- Comfort-height toilet in the bathroom you will use during the night. (A bit pricey, but remember you will be using this bathroom without your leg on for as long as you live there.)
- Comfortable easy on/off clothing that is easily accessible.
- Wear clothing with lots of pockets to transport items.
- Arrange furniture to make safe open direct paths.
- Rolling adjustable height doctor’s stool in kitchen (this will allow you to prepare your own food).
- People in place to offer support.
As I write this two and one half months post amputation, I have no regrets and it was one of the best decision have ever made. I do warn the first few weeks are difficult and it wasn’t until week four or five before I knew I had made the right decision. So hang in there and stay strong!!
Help is only a message away! Send me a message by using my contact button, private message me through my Facebook page or Twitter. I would love to chat with you!